Thursday, June 24, 2010

Little Leaf Cake

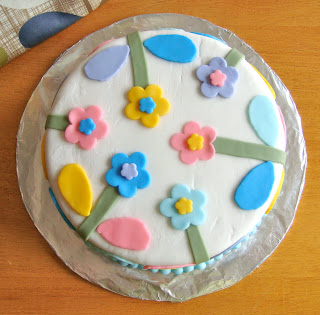
Well, I am finally done with my Wilton classes. For this last set of classes, we didn't have to make a cake until the final class. AND we could design it however we wanted! Hooray! I was racking my brain trying to figure out what I should do when it occurred to me: an Orla Kiely cake! 

Orla Kiely, for those of you who don't know, is an Irish designer with a clothing line as well as purses, travel, homeware, and stationery. You may have seen some of her stuff in Target a year or so ago. Many of her patterns are floral or leaf motifs so of course I love her stuff. I couldn't find a leaf fondant cutter in the shape I wanted so I googled "making cookie cutters." I used this wikiHow article to make my own cutter. I printed out a bit of this Orla Kiely leaf pattern (my inspiration :) and cut out a leaf as a template. Then, I cut some floral foam in the shape of the leaf to use for molding the aluminum in the shape I wanted. I removed the foam, added a couple of staples to secure, and voila! My very own fondant cutter. It cost me about $5, and now I have a giant lasagna pan with a hole in the bottom (very useful, I know) and some leftover floral foam for future projects. Score!


Enough of the babbling, here is the cake! (with my Orla bag):


I couldn't get the fondant as smooth as I would have liked, but that's because it chose to stick to my mat despite my greasing it. Oh well. It's still pretty cute.

Leaf out.

Tuesday, June 15, 2010

Scrappin' with the Queen Bees

Saturday (through the fierce wind and rain), I traveled to the other side of town to go to a "crop" (aka scrapbooking group) hosted by the Queen Bee Croppers. I have never done any scrapbooking and thought that I wasn't interested in ever doing any (I can hear you asking, "why did you go to a scrapbooking meetup then?"), but now I'm starting to think that it might be fun. You should have seen the ginormous piles of photos these ladies carted with them to the meetup. One of the croppers had completed a 4-inch-thick photo album from their family trip to Disney World and was working on a second one for the same trip.


It was great to meet some new people, and most of what I did while I was there was talk and watch what everyone else was doing. I made one Father's Day card in the four hours that I was there. The only problem with me picking up scrapbooking as a hobby is that I hardly ever take pictures. I take my camera with us whenever we go on a trip, but then I never think about documenting anything. It would be pretty difficult to scrapbook with no pictures. I'll have to work on that.


In shop news, I have 10 sales! And 28 fans on FB! Thanks everyone for your support!


Leaf out. 

Monday, June 7, 2010

Have you gotten a Father's Day card yet?

No? Then, make one!

I always have problems figuring out what to do for Father's Day. Pops can never come up with gift ideas so I always have a hard time coming up with something for birthdays, Christmas, or Father's Day. And the same goes for card ideas. I came across a couple of handmade wallet cards the other day and decided to come up with my own wallet card that includes a pocket for a gift card. I recently made this card for my brother-in-law's birthday (I put his initials on the front instead), but I thought it would be appropriate for Dad's Day as well. I chose brown for my card, but if some other color strikes your fancy, go for it! 


The closed card measures 4.25 inches by 5.5 inches (A2 size). You will need to cut 4 pieces of cardstock. Three for the body of the card and one for the insert. Cut the following sizes: A - 4.25 x 11 inches, B - 3.75 x 11.5 inches, C - 4 x 2 inches, and D - 3.5 x 10 inches. A, B, and C should be the same color.
For the outside of the card, score piece A down the middle at 5.5 inches for folding.
Score piece B for folding at 5.75 inches. Then, score 1/4 inch from each short end and again 1/4 inch from the bottom (one of the long sides) of the card. 


Score piece C for the gift card pocket 1/4 inch in on each short side and 1/4 inch in on one of the long sides. This is what both pieces should look like after all of the scoring fun:
To make things fold more easily, on each of the bottom corners of piece B and C, draw a line across the corner creating a triangle. 
Cut along this line for each corner. This is piece C after the corner cuts:
For piece B, there is one additional cut in the center. Draw two lines (creating another triangle) down from the center score starting at the bottom score level. Hmm not sure if that made sense...please see picture below :)
Cut along those lines, and you will have this:
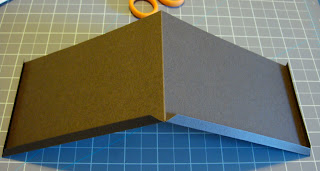
Now, fold those edges! (on both B and C, please). Oh! And fold piece B in the middle in the opposite direction of the flaps. 
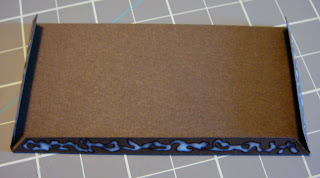
Apply adhesive to the folded flaps.
Attach piece B to the inside of piece A making sure to match up at the center fold.
Now, to add the gift card pocket! Apply adhesive to the flaps on piece C and attach to the inside (right or left, whichevs you want) of the card making sure to center it.
I got a little ahead of myself and already put the insert (piece D) in the card. Before you do that, score piece D down the middle at 5 inches for folding.
Now, for some pizazz! Stamp or write whatever you want to say on the insert. I chose to put a "Happy Father's Day" sentiment as well as some trees (Stampin Up Funky Forest std roller).
On the front and on the inside, I added some faux stitching with a silver gel pen (I just used a piece of cardstock as my straight edge to make short repeating lines or "stitches").
There you have it! 


*If you have any questions about my instructions, leave a comment or email me, and I'll be glad to help :) 


Leaf Out.